Creating Clean Audio For Podcasts
In this tutorial we will be going over these 3 basic sections.


DEVICES & SOFTWARE
Before you start this tutorial please download the following tools and software. Audacity and Italk (Iphone app) are free programs. Adobe Audition is not free, but you can download a free 30 day trial.

Audacity is a free Digital Audio Editor that will allow you to process, edit and export your audio files for your podcast. If you have a microphone you can record directly into this software as well.
Mix, edit, and create audio content with a comprehensive toolset that includes multitrack, waveform, and spectral display. This powerful audio workstation is designed to accelerate video production workflows and audio finishing — and deliver a polished mix with pristine sound.

iTalk Recorder is a full-featured recording app with a streamlined and intuitive user interface. Three levels of recording quality (11.025, 22.05, or 44.10 kHz sample rates), lets you manage your recordings, all with just a fingertip.
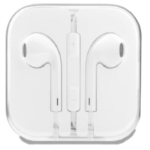
Designed by Apple • Deeper, richer bass tones • Greater protection from sweat and water • White color • Unique in-ear design • Inline remote & microphone • 3.5 mm headphone plug.
Optional Equipment

Want to sound like you are in a recording studio? These cool adapters let you record 2 or 3 voices at the same time. Simply add additional Apple Earbuds to these adapters and you can instantly have a mobile recording studio. These adapters work on Iphones, Ipads and Android devices.

Stony-Edge Microphone/Headset/Headphone Audio Y Splitter Cable for iPhone or Smartphones, 3.5mm TRRS Male to 2 X Female, 3 Feet cable.

This 3-ring / 4-pole stereo audio splitter cable features one Male 3.5 mm connector to 3 Female Connectors for splitting an audio source.
RECORD & PROCESSING
Record Using

Italk App

Any Iphone or Ipad

Apple Earbuds & Mic
Step 1

Make sure your Earbuds are completely plugged into your device. Open up the ITALK app on your Iphone or Ipad. You will see this screen. Before you click the record button you want to name the clip by touching inside the area marked “Recording Name”. Fill in the name of the clip. If you don’t know what to name it yet, once you start recording it will give each recording a generic name “Untitled 1, Untitled 2, Untitled 3” etc. After the recording you can change the name to whatever you like. Next you want to select the audio quality. This setting should be at “Best”. Audio monitoring can be turned on or off it is your preference. This feature is great to turn on when you have multiple guests. It allows everyone to hear each other through their own headphones while being recorded.
Before recording make sure you find a nice quiet place to record. Stay away from noisy areas, outside, or in a bathroom. The important thing is not to have any echo in the room. You can eliminate echo by putting a blanket around or in front of where you are sitting. This traps the audio waves from bouncing off the walls and back into the microphone.
When you are recording be careful not to move around or you will get rustling sounds from the microphone. When you are creating your podcast it is wise to setup a recording area so that each week the recording will have the same good sound. If you change locations between podcasts you will hear the difference and it may be harder to clean up or remove background noises.
To Start Recording Press the big button in the center of the screen. Click the button again to stop recording. When you are finished click the “done” button.
Step 2
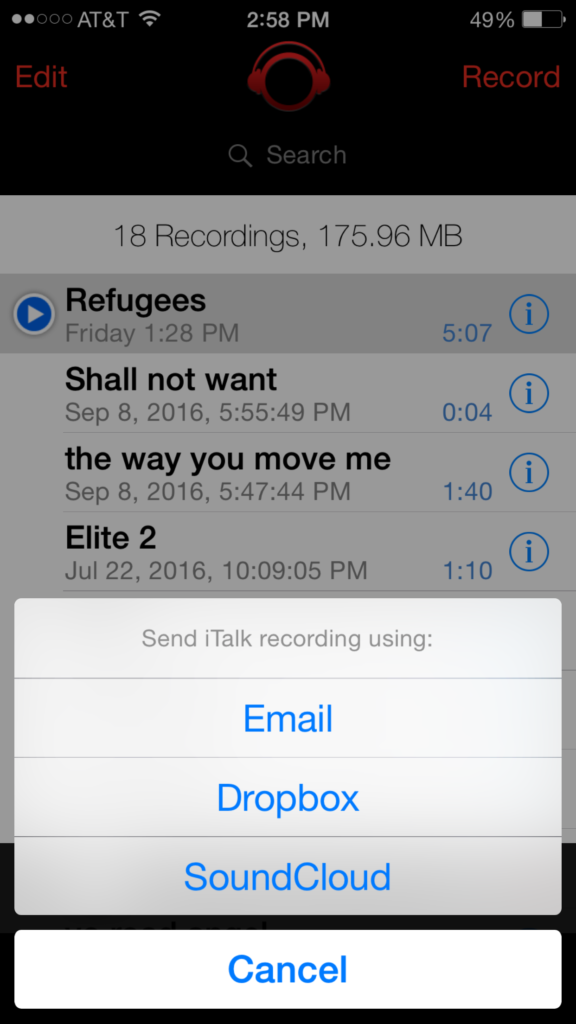
Once you have finished recording and naming your clip, you can upload the audio to your email, drop box or sound cloud accounts. After you have uploaded your audio file, then download it to the laptop or desktop computer you installed Audacity and Adobe Audition on to.
Please note that this tutorial is to show how to record on on Iphone or Ipad. If you have a USB microphone you could record directly into the computer and bypass using Italk.
Process using

Audacity

Adobe Audition
Apple Earbuds & Mic
Step 1
Now that you have recorded your podcast audio, it is time to start processing it. One key element to note when you are processing voice audio and removing background noises is that this task should be done with headphones. If you use the built in speakers of your laptop or external powered speakers it is very hard for you to hear the background noise in your audio track because you will be hearing other background noises in the room your are editing in. There are sounds of the computer fan, air conditioning and other sounds that your brain will discard as simply other room noise. I recommend using the same earbuds you used to record your voice. Now simply plug them into your computer’s headphone jack. You won’t be able to use the microphone but they will still work as headphones.
To begin, open audacity and load your audio file. It will ask if you want to make a copy of the file or work with the original. For beginners it is always safer to make a copy first so that if you mess up you can always go back to the original recording and start over. Copy the file and then you are ready to begin.
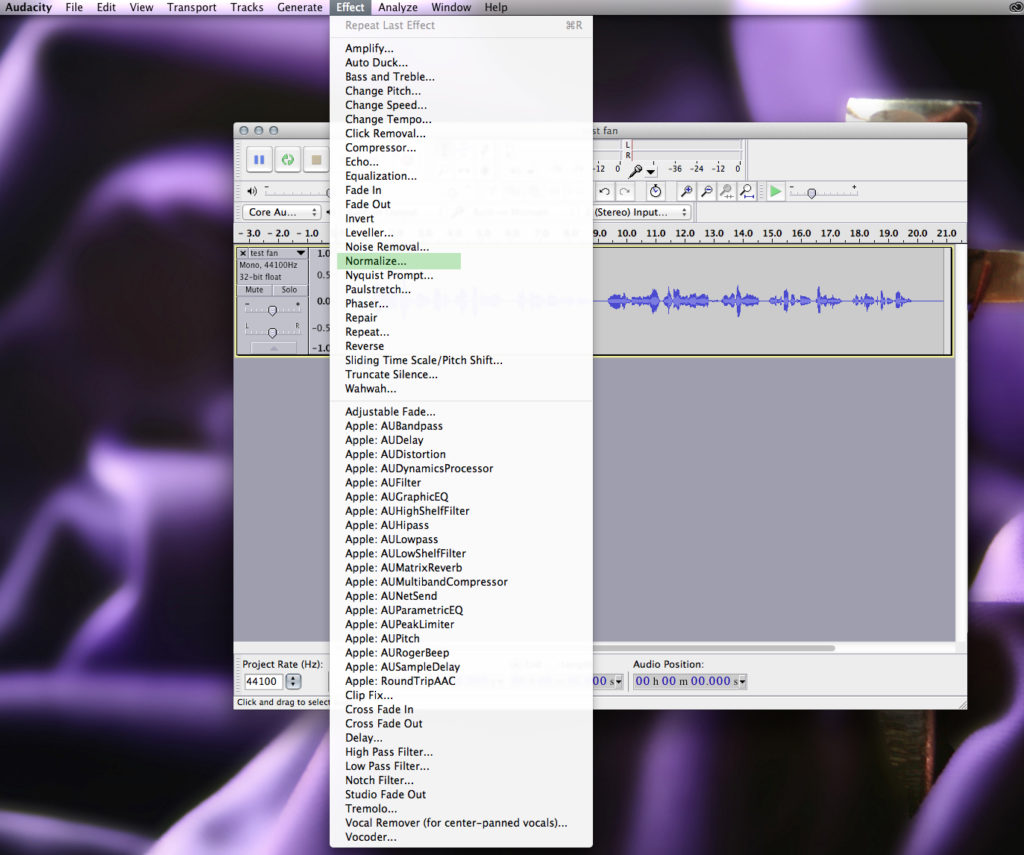
The first step is to normalize the audio. This will even out and raise the volume of your recording to smooth it out. You can find “Normalize” under the effects tab.
Select Remove any DC offset. Select Normalize maximum amplitude and set it to -1db. Leave the “Normalize stereo channels independently” unchecked. Select “OK”.
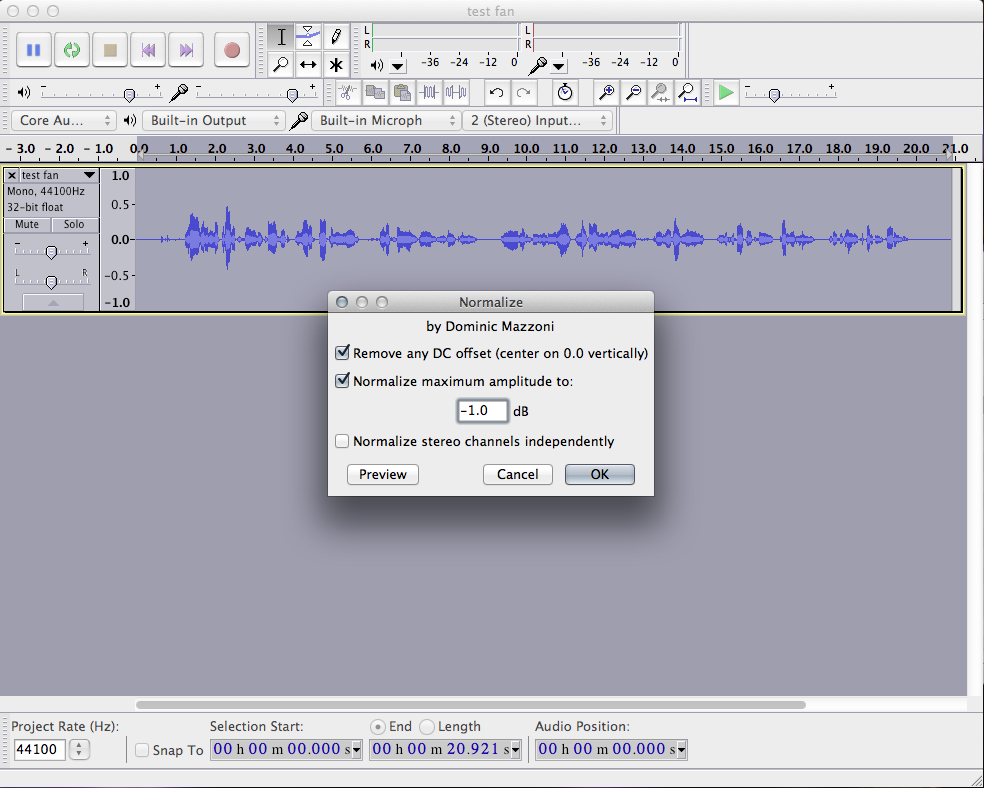
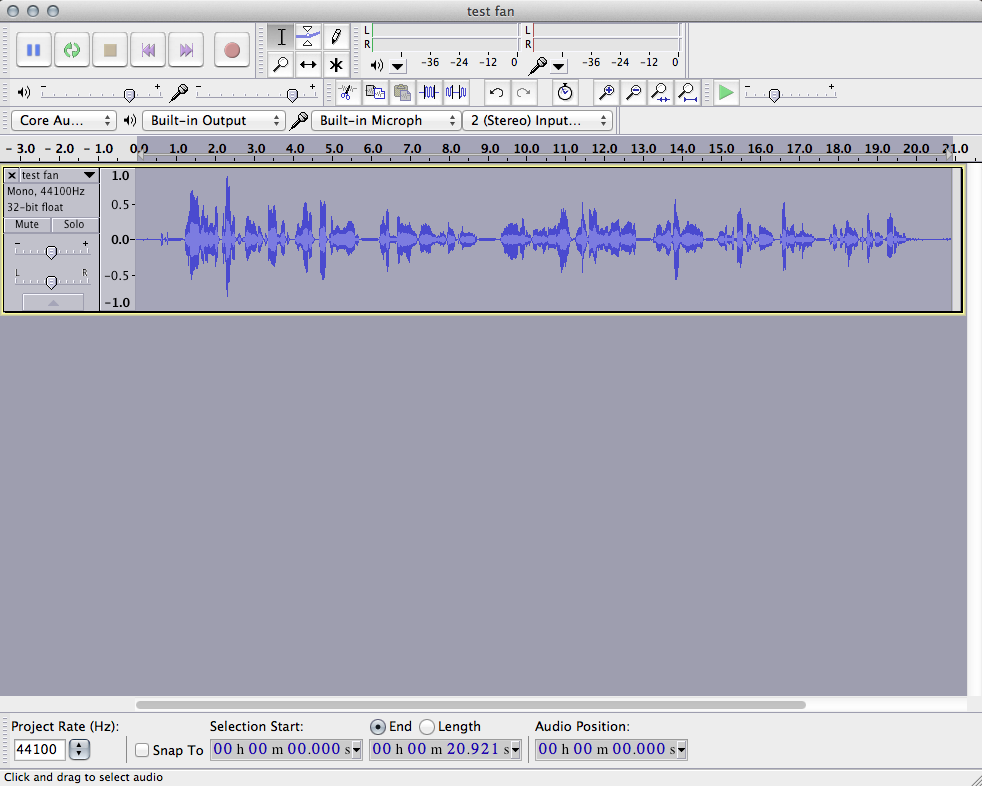
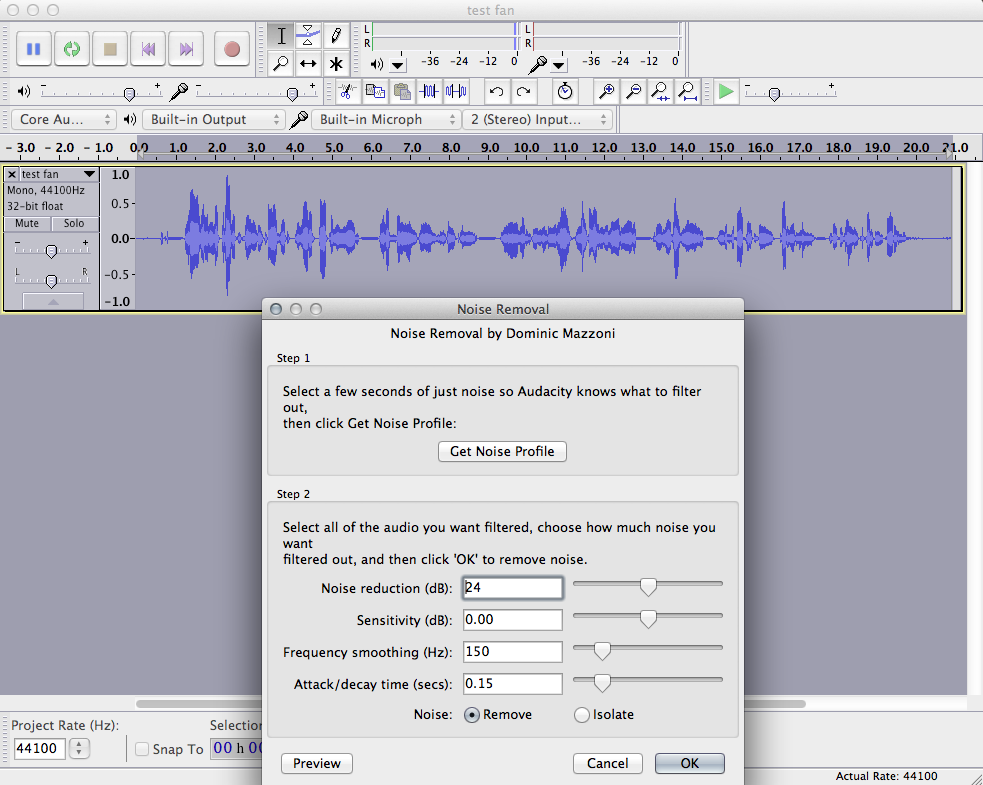
As you can see, the audio waveform has increased in size. The volume is louder, but you can hear more of the background noise.
Important Note: If you see a waveform that is flat at the top and bottom (looks like it is cut off) this is not good. Click undo from the edit menu and start the process again, but try -3db. You do not want to over amplify your audio (flat lines on the top and bottom of the waveform peaks) otherwise it will sound distorted and bad. Normally it is not a problem when recording with ITALK and the earbud microphone.
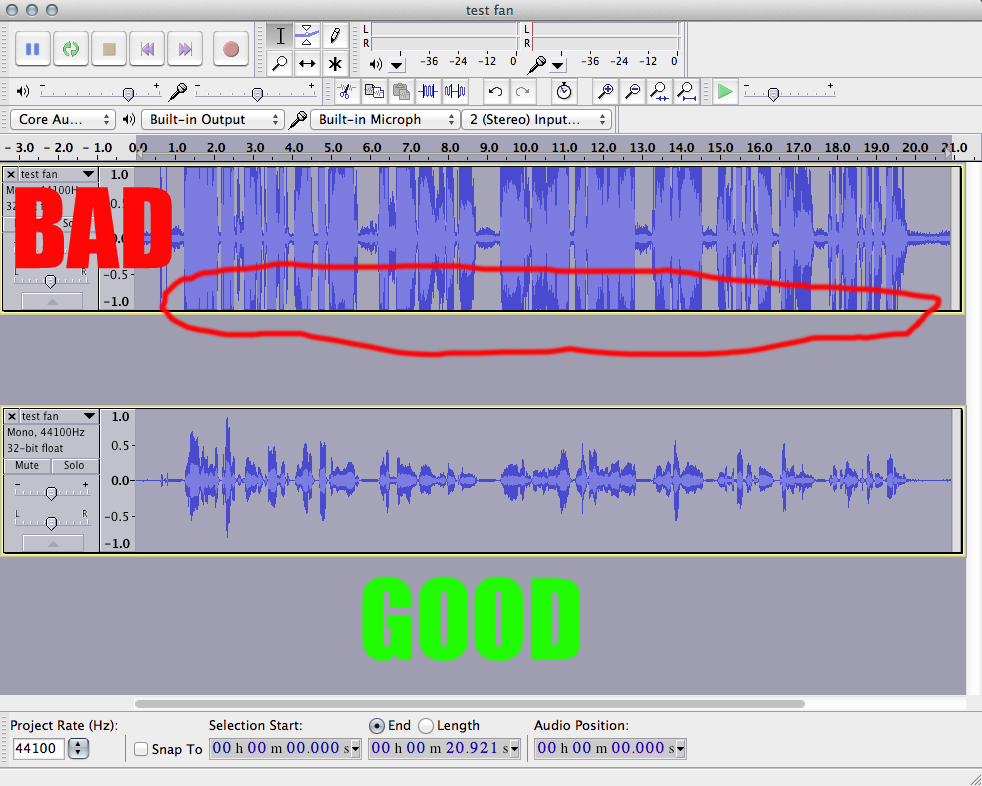
However, if you are using a usb microphone and recording directly into the computer then you need to make sure your input settings are not too high or you will run into this problem. You can always play around with the settings and click undo until you get it right. You are now ready to move on to step 2.
Step 2
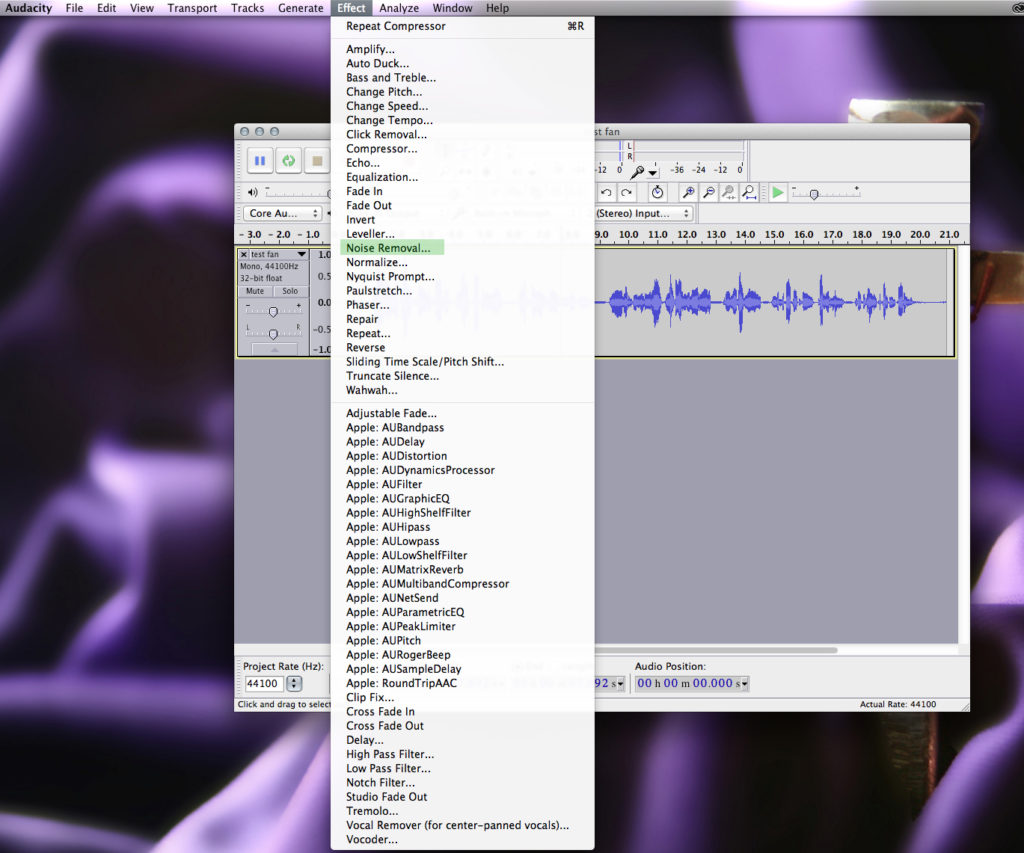
After you normalize your audio file it is time to remove any unwanted background noises. Under the effects tab you will see an effect called “Noise Removal”.
The first step in noise removal is to get a sample of the noise you want to remove. You do this by selecting a piece of the audio that only contains the sounds you want to remove. Normally I use a few seconds at the beginning or end of the clip. It is good practice to keep recording a few more seconds of silence at the end of your podcast. This is what we call “room tone” and you can use that to sample the noises in the room so you can remove them. Once you have removed the noise, these extra seconds will be cut out during the edit process.
To begin, select a piece of audio at the end of the clip by using your left mouse button. Click inside the gray area near the waveform and drag your mouse to the right. You will see a dark gray area start to appear. When you have enough area selected, release the mouse button. Next open up the effects tab and select Noise Removal. Click the button that says “Get Noise Profile”. Once that is complete select ok.
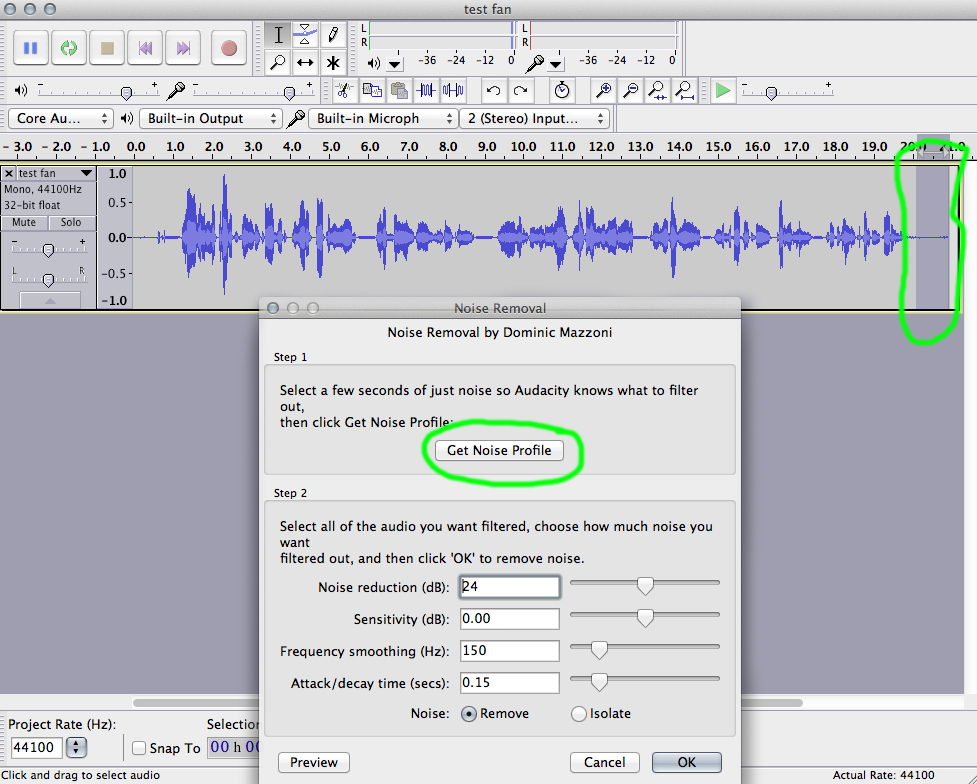
Now that you have your noise profile you must select the entire waveform to remove the noise. To do this click inside the gray area near the waveform and then use the “command” + “A” keys to select all and the whole waveform will be highlighted in dark gray or you can start at one end of the clip, click and drag your mouse until you see the entire waveform highlighted in dark gray. Select “Noise Removal” from the effects tab again. With the entire clip highlighted, set the following parameters:
Noise Reduction to 24,
Sensitivity to 0.00,
Frequency smoothing to 150,
Attack/decay time to 0.15
Check the Noise button to “remove”
Click OK when you are done.
Note: background sounds vary, but this is a good place to start. You can adjust the settings to your liking and hit the “Preview” button to hear it before you select ok. It is important that you preserve the voice as much as possible. If you take out too much noise the voice starts sounding robotic so use your best judgement.
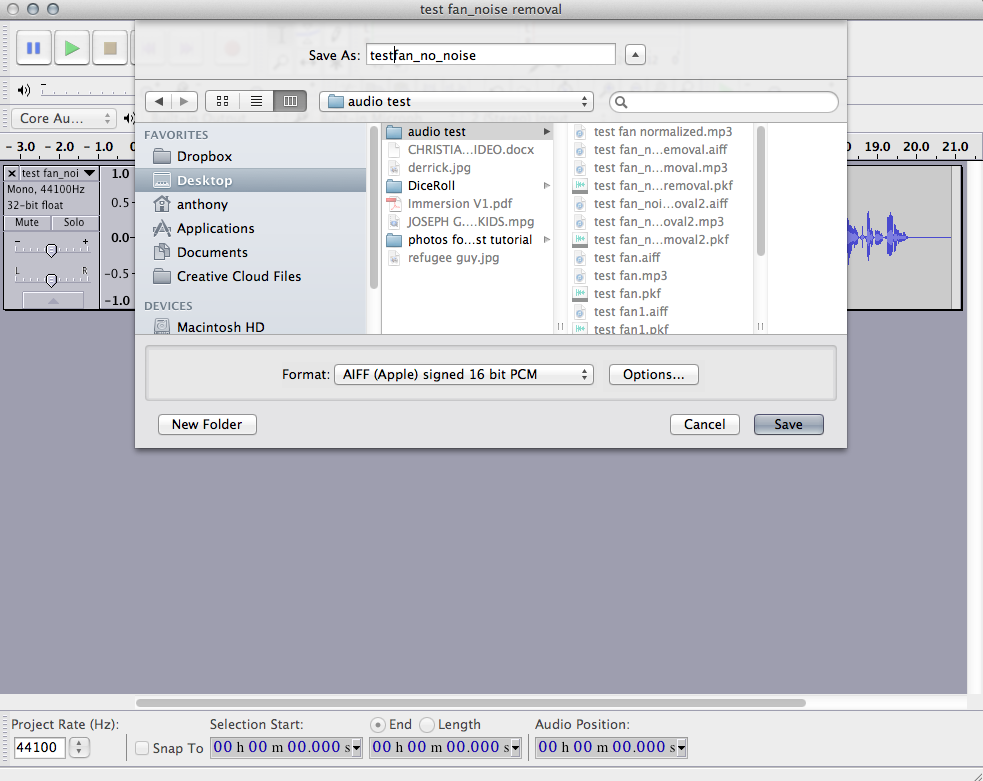
If you listen closely you can still hear bits of the background noise and the fan at the end of the clip. This is perfectly normal if there is a lot of background noise. It is better to preserve the voice at this stage rather than remove all the background noise with this filter. We will be cleaning up the audio file even more in our next step when we take it to Adobe Audition. But before we can do that, we must first export our clip. Select “Export” from the “File” drop down menu at the top. Name the file and save it as an .aiff or .wav file and give it a name like “PodcastName_No_Noise.aiff”. Now you are ready for step 3.
Step 3
OPEN UP ADOBE AUDITION & IMPORT AUDIO FILE
The next step in called dynamic processing. You can do this in Audacity, but I like the simplicity of the filter in Adobe. I will show you both. Dynamic processing expands and compresses the audio signal. It boosts audio below a certain db and compresses audio that is above a certain db. It also sets a “noise silence floor” at a certain db to remove any unwanted background noises. The result is a smooth sounding clean audio track.
In Audition begin by opening up the filter “Dynamic Processing”, it is located under the “Effects” tab, under the “Amplitude and Compression” Tab.

Once the filter is open, go to the preset pull down menu at the top. Find a preset called “Noise Gate” and select it, (it may have @10db or @20db as part of its name. We are now going to modify this preset and save it as a new preset. First lets make sure the settings at the bottom are correct. For segment 1 and 2, click and drag the white dot located on the blue line between the numbers 1 and 2. For segment 2 and 3, click and drag the white dot located on the blue line between the numbers 2 and 3. You won’t need to touch the lower white dot. move the dots until the numbers line up at the bottom of the page to reflect the following:
Segment 1 Ratio = 1:50:1, Type= Expander Above= (-20.00) db
Segment 2 Ratio = 1:27:1, Type= Expander Below= (-20.00) db
Segment 3 Ratio = 1:52:1, Type= Compressor Below= (-54.86) db
Segment 4 Ratio = Infinite, Type= Expander Below= (-93.70) db

Once you get the numbers to match, click the button on the top of the filter next to the preset drop down menu. It is the button with the arrow pointing down. This will ask you to save the preset. Give it a name of “Noise Gate @ -20db adjusted”. Click save. Now you can click the play icon at the bottom of the filter to listen and the loop button so that it will continually loop. If you still want to adjust the sound you can move the points on the blue line to adjust the sound. Clicking on the green power button on the lower left of the filter turns the filter on and off so you can hear the difference in real time of what the audio sounds like with and without the filter on. You most likely will need to raise the “Make-Up Gain” by 3 to 6 db. You want the sound to be loud but not distorted. Once you are happy with the sound click apply. Now the audio is clean of any background noise. Click below to listen what the original file sounded like compared to the final version.
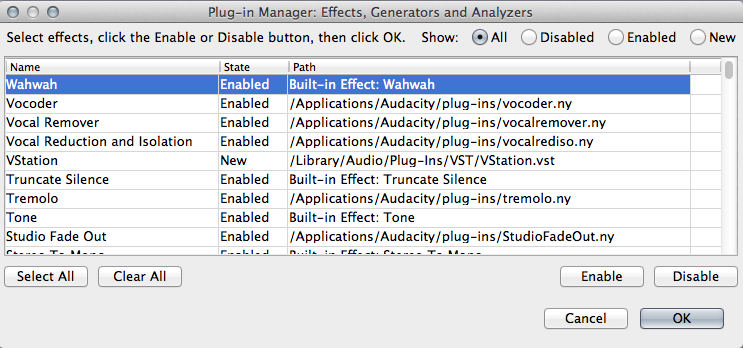
Before we start using Dynamic Processing in Audacity you must first check to see if the “Apple AU” filters are enabled. To enable them, open Audacity, click on the EFFECTS tab at the top of the screen and click on Add/Remove Plugins… This brings up a list of the effects. From here you can use the “Select All” button and then the “Enable” button and all the plugins should now be active in audacity.
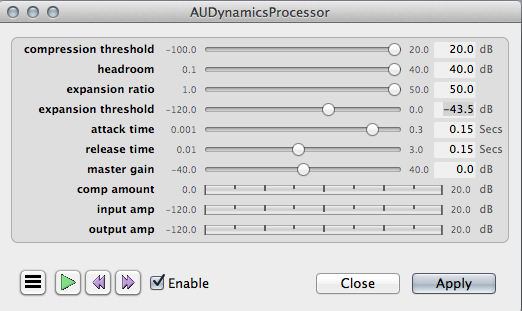
Now that your plugins are enabled, click the “Effects” tab and launch the “AUDynamicProcessor” Plugin. Click the menu button on bottom left of the filter. Go to options and choose “Generic”. Close out the filter and open it again. Now you will have an easier interface to work with. Select the filter menu button again and this time go to “Factory Presets” and select “Hard Gate”.
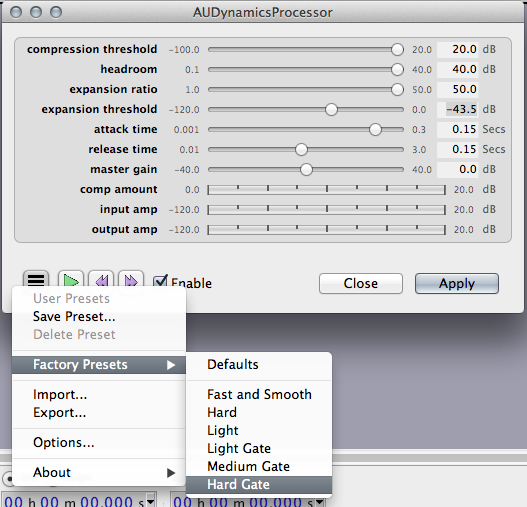
Depending on how bad the background noise is or your breathing, you will need to adjust the settings. I like to remove most of my breathing sounds along with the background noises. Here are the settings I use, but you can play around until you like the sound. “Expansion Threshold” is where you can adjust the cut off point. If you hear your voice getting cut off too much then increase the setting to around -50db.
You are now ready for the next step – Editing and Outputting or you can take the following additional processing step.
Additional Step
This step is called “Multiband Compressor”. It is used to make your voice sound like it is on the radio. This filter should only be used on podcasts that are not going to be broadcast on the radio. Radio stations have their own processing and if you give them a file that is already heavily processed, it will not sound good when it is being broadcast.
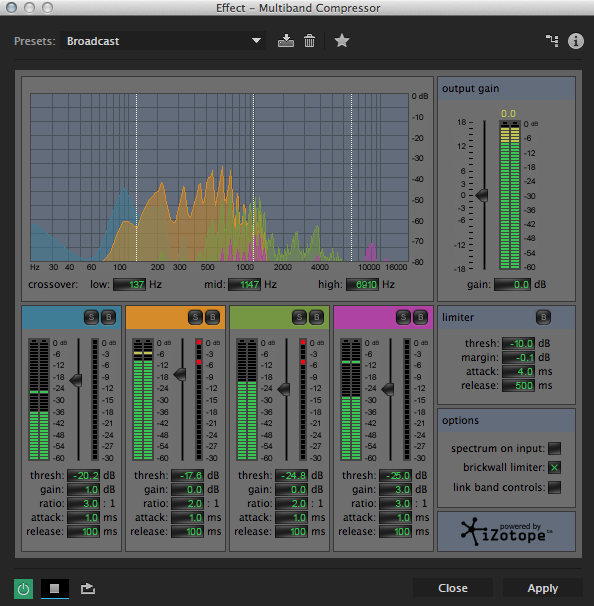
To begin in Adobe Audition, click the “”Multiband Compressor” filter located under the “Effects” tab under the “Amplitude and Compression” Tab.

This filter has many presets to choose from. I like the “Broadcast” or “Tighter Bass” presets for my voice. Everyone’s voice is different so play around with the presets and settings until you are happy with the sound. You can then save your settings as a preset by clicking the button next to the preset drop down menu. It is the button with the down arrow. Save your preset with a new name and store it to use on all of your future podcasts.
For the best results, make sure your “Output Gain” (located in the upper right corner of the filter) levels are as close to 0.0 as can be without turning red. You can adjust the slider on the left of the meters up and down to make the output louder or softer. You can play the audio by clicking the “Play” button on the bottom of the filter and toggle the filter on and off by clicking the green “Power” button. Once you like the sound click apply.
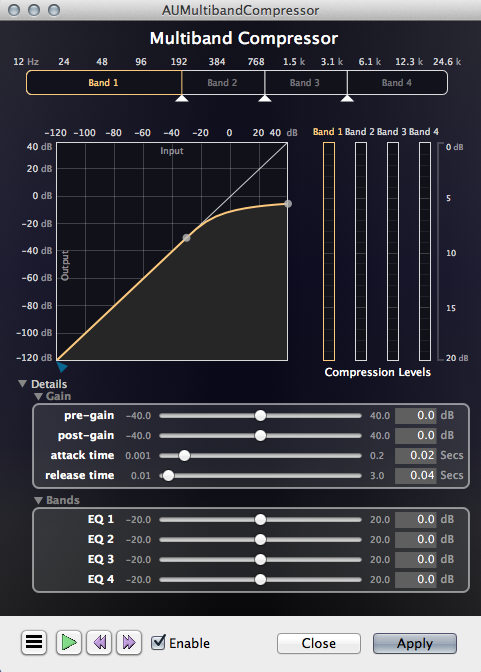
For Audacity, open “Effects” Tab and select “AUMultibandCompressor”. Open the “Options” button from the menu button located at the bottom left corner of the filter window. Select “Full” then close out the filter and open it again. This will give you a simpler interface for this plugin. Open up the filter menu again and select “Factory Presets”, here you will find a few types. You can experiment with them and toggle the “Enable” button on and off to hear the difference between the filter and the original clip. Once you find the right settings, save the preset as a new name. To save the preset open the filter menu again and click “Save Preset”. When you are happy with the sound click “Apply”. You are now ready to go to the next step…Editing.
EDITING & OUTPUTTING
Edit Using
Audacity
Adobe Audition
Now that you have saved your final processed audio file it is time to start editing it. You can use Audacity or Adobe Audition to edit your audio file. In Audacity making cuts and exporting is very simple, but creating cross fades takes a little more finesse. When you are editing your audio to cut out the blank pauses, umms, double word stutters, etc. you want to blend the cut with a crossfade so the audio sounds smooth. Without a crossfade it will sound like your audio abruptly jumps to the next cut. For this tutorial I will show you how to edit and create crossfades in both programs.
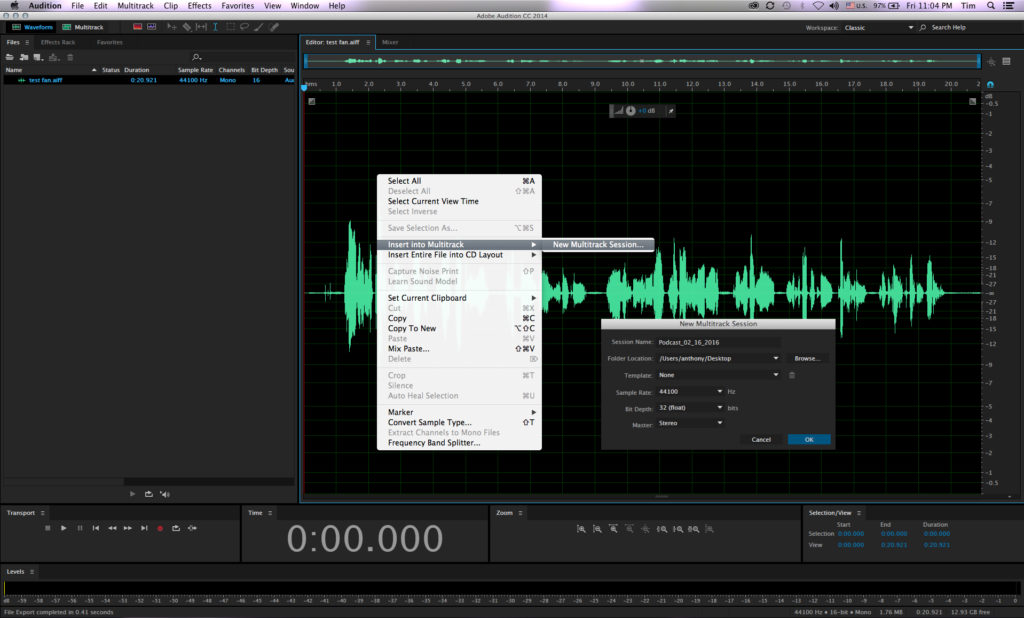
In Audition we first need to move our clip over to the Multitrack. To do this simply right click anywhere on the open waveform. Select “Insert into Multitrack”. Then select “New Multitrack Session”. Save your session with a new name. Set sample rate to “44100”, bit depth to “32(float)” and master to “Stereo”.
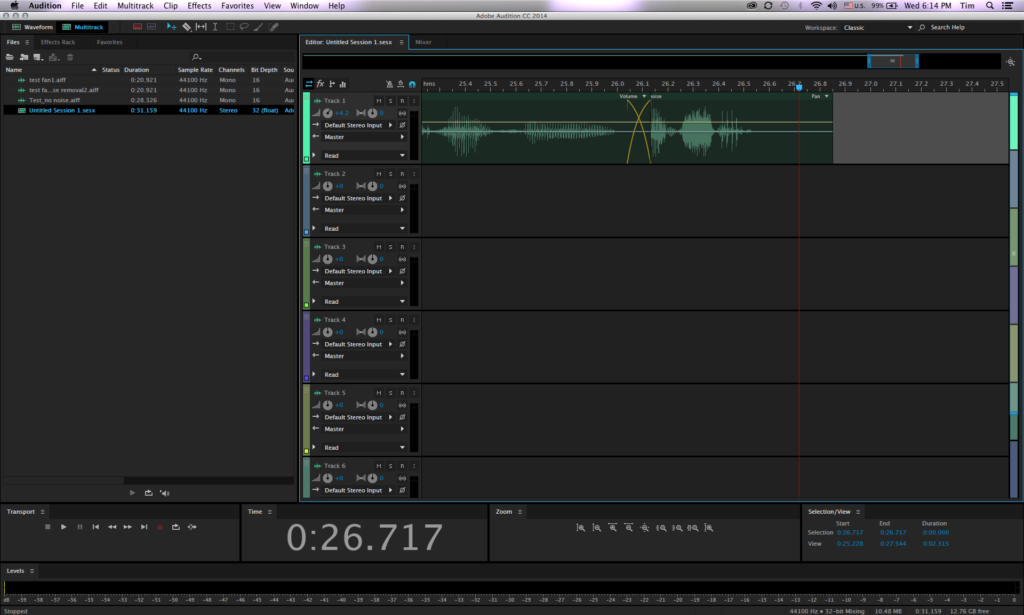
To begin Editing you will need to use the Razor tool. The icon is located at the top left of the screen. Click the icon or hit the “R” key on the keyboard to switch to the razor tool. the “V” key returns you to the default tool. The spacebar starts and stops playback of the clip. Find the place you want to cut out. Use your razor tool to cut the front and end of the section. Right click your mouse and select delete.

To create a crossfade simply click and drag the clip over the end of the clip infront of it and you will see a yellow “X” start to form. This is the crossfade and you can make it as long or short as you like. I normally do a 3 to 5 frame crossfade depending on the cut. Begin editing your file.
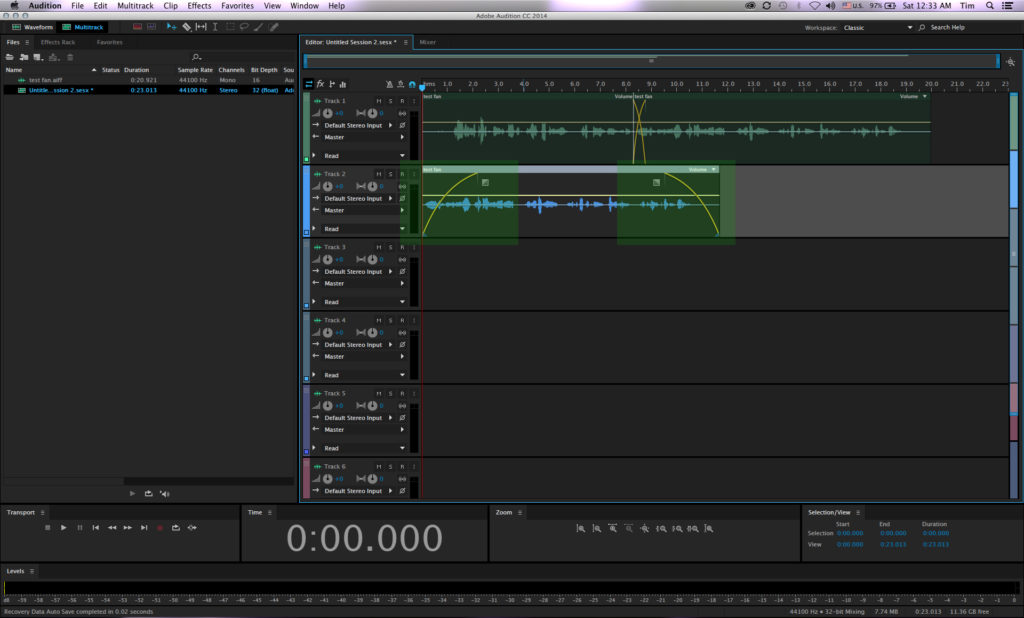
You can also add music intros to your podcast and fade them in and out. To do this select “Import File” from the file drop down menu. The file will appear in your bin on the left. Click and drag the clip into any open track and slide it into the position you want. To fade the clip in, click on the little gray box in the upper left corner of the clip and drag it to your right. You will see a yellow line curving behind. This is the fade in and you can make it as long or short as you would like. To fade a clip out, click on the little gray box in the upper right corner of the clip and drag it to your left. Remember that any software program can crash or quit unexpectedly so it is important that you save your work often. Once you have finished all of your cuts and crossfades you are now ready to Output your audio file.
To begin editing in Audacity, click and drag in the waveform that you want to remove. This area will become highlighted in dark gray. Use the zoom tool to see the waveform closer. For precise editing to adjust your selection, here are some key commands:
Shift Key + Right Arrow Key expands the end of the selection 1 frame at a time
Shift Key + Left Arrow Key Expands the beginning of the selection 1 frame at a time
Shift Key + Command Key + Right Arrow Key contracts the end of the selection 1 frame at a time
Shift Key + Command Key + Left Arrow Key contracts the beginning of the selection 1 frame at a time
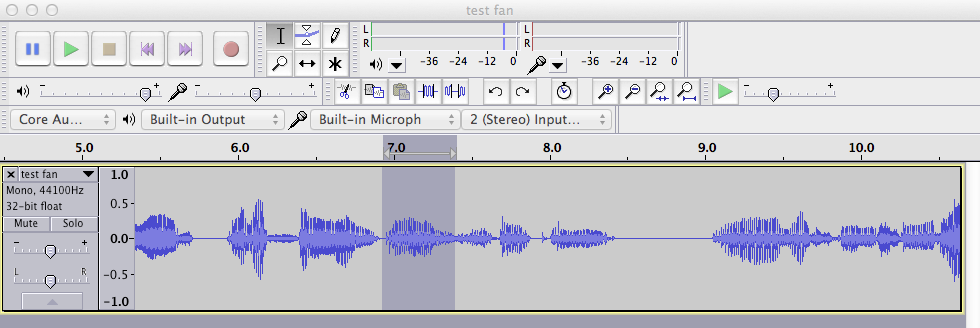
Once you have the exact selection highlighted hit the “Delete” Key and the selection will be removed. As you can see, I have highlighted one word from the waveform. By hitting the “Delete” Key the word will be cut from the waveform.
You will see that the selection is deleted, but there is no break in the waveform showing you where you just made the cut. However, the timeline marker is in the middle of the new cut. It is very important that you do not move down the timeline before making your crossfade. It will be much harder to find the cut point and go back to fix it. Using your keyboard short cuts (Shift Key + Right Arrow, Shift Key + Left Arrow), expanded a selection in front and behind the timeline marker.
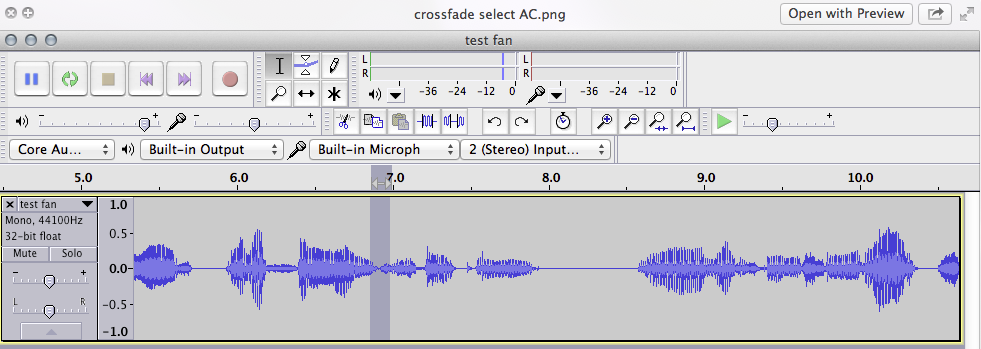
To create a crossfade, open “Effects” tab and select “Crossfade Clip”. It will automatically crossfade the highlighted selection. This may take a bit of finessing for each clip. You will need to listen to the cut. If you don’t like the sound then select “undo” from the Edit menu or use the hotkey “Command + Z” Keys. Add or subtract to your crossfade selection, then apply the effect again.

Click the audio files below to hear what it sounds like to make an audio edit that removes one word and smooths out the cut with a crossfade.
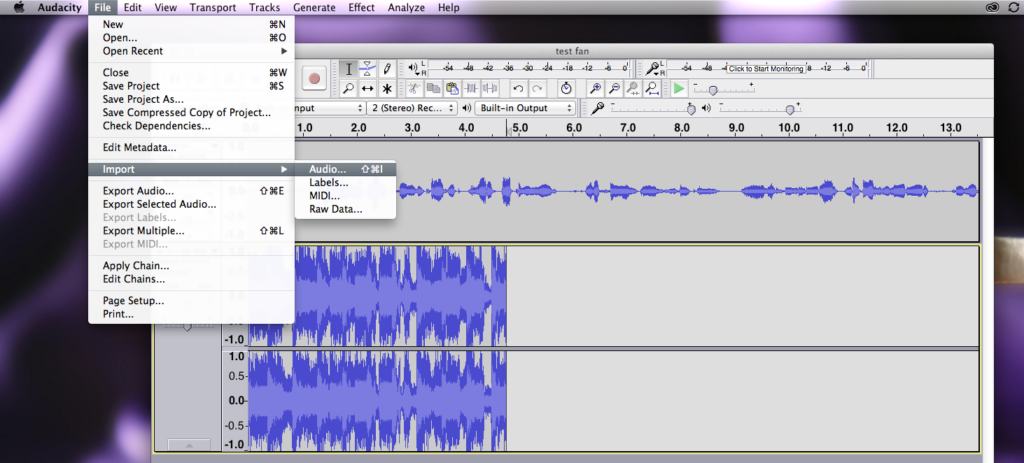
To add music, sound effects or another voice to your Podcast, Select “Import – Audio” from the “File” Drop down menu at the top. Import the audio file you want. It will automatically create a new track on the timeline. You can move the clip around by clicking and dragging it left or right.
You can Fade In or Fade Out of the clip by highlighting the front or end of the clip by using your mouse. For the Front of the clip use the “FADE IN” effect located in the “Effect” Tab at the top of the screen. For the End of the clip use the “FADE OUT” effect. For intro music it is nice to have along fade out so you hear your voice start speaking while the music slowly fades away. The opposite is for outro music leading to a commercial break or the end of the Podcast. You want to have a slow fade in that builds until your voice stops.

Once you have completed your cuts and crossfades, you are now ready to start the Output process.
Output Using
Audacity
Adobe Audition
Once you have finished all your cuts and crossfades you are now ready to output your final editing master file. There are several ways to export your final master. I suggest outputting 3 separate files. One uncompressed .wav file, One 320kb .MP3 file and one 128kb .MP3 file. For sending your file to a radio station for broadcast they will require an uncompressed .WAV file or a 320kb .MP3 file for the highest quality. The 128kb .MP3 file is for uploading to the internet or streaming service.
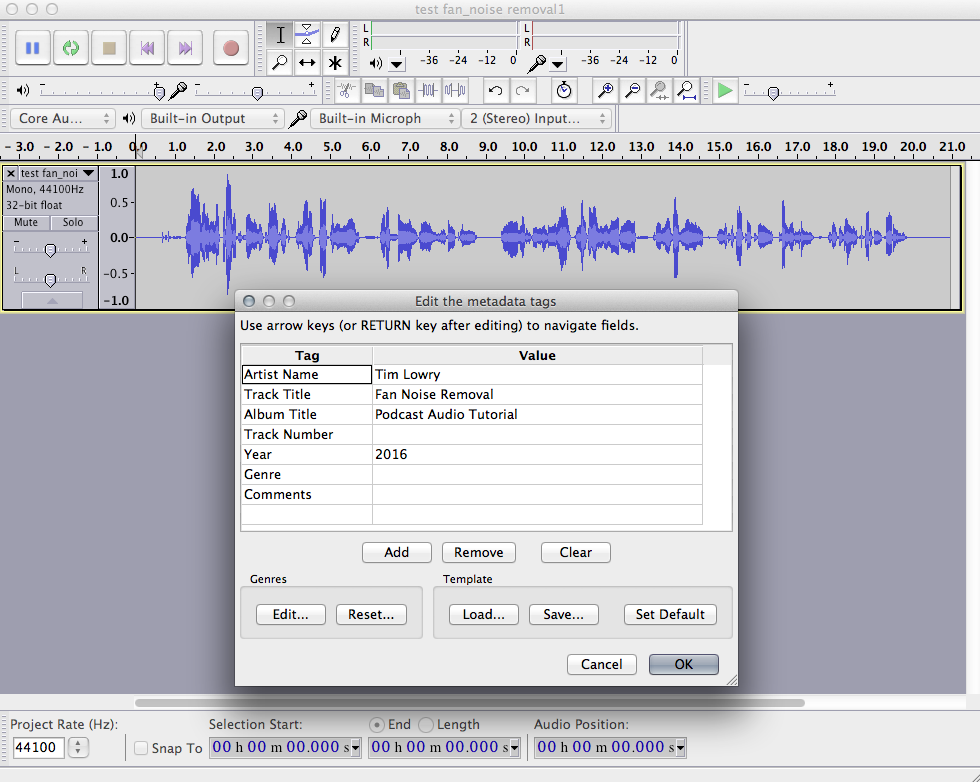
You can export from either program Audacity or Audition. I like to create my WAV files in either program, but I like to create my MP3 files in Audacity. You can create MP3’s in Audition as well, but Audacity has a cool Meta tag editor on the MP3 export so you can add the Title, Author Name, Series Name. This information is used by most players and displays during playback on Itunes or other audio players.
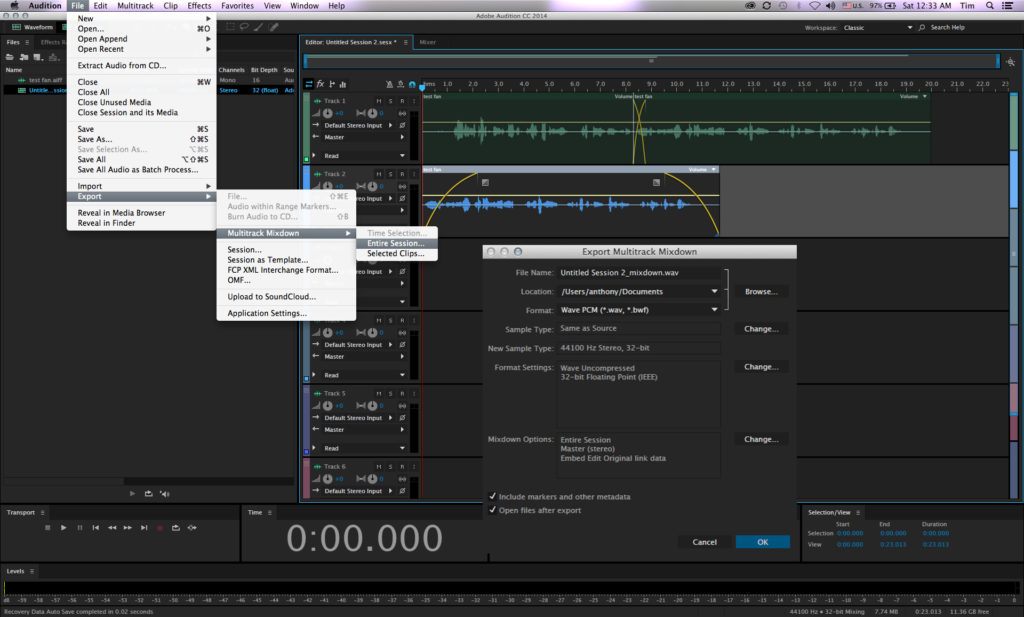
To export from Adobe Audition select export from the “File” drop down menu located at the top left of the menu bar. Then select “Multitrack Mixdown”, then click on “Entire Session” button. Name the file, select the format to “Wave PCM”. Leave everything else the same and click “OK”.
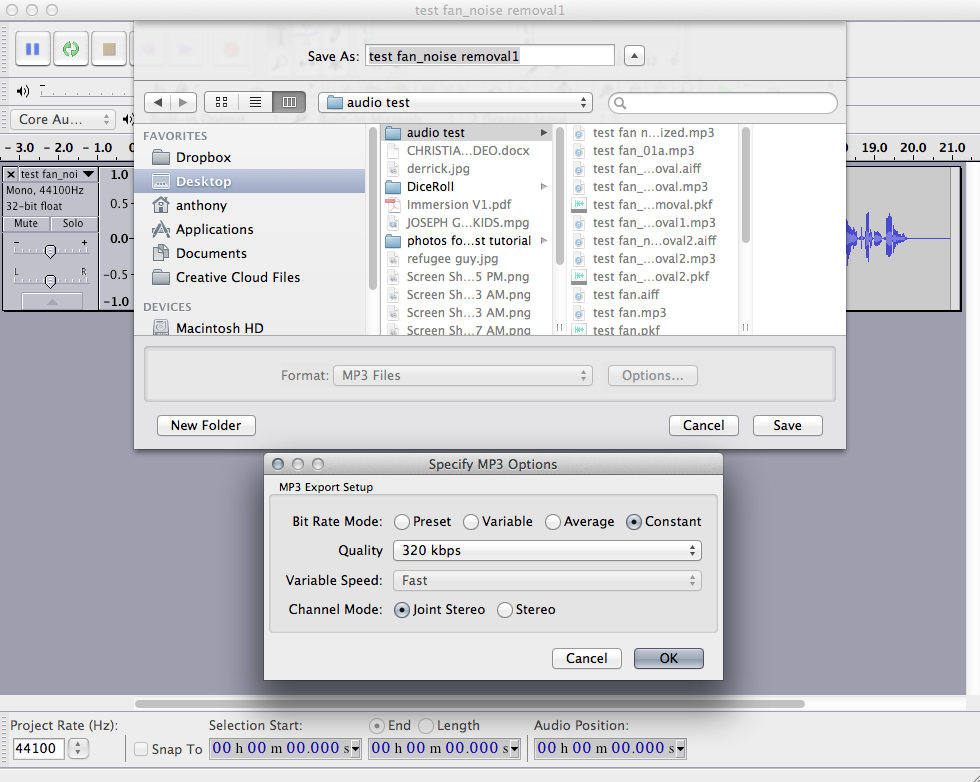
To export an MP3 from Audacity, open the WAV file that you just created. Next, select “Export” from the file drop down menu. Set the MP3 settings as follows:
Bit Rate = “Constant”
Quality=”320 kbps”
Variable Speed = “Fast”
Channel Mode= “Joint Stereo”
Create a name for the file and then click “OK”.
Next you will see the metadata tag editor pop up. This is where you add all the data that the players will read when playing back the file. I normally just input the Artist Name, Track Title, Album Title and Year. You can do what you like, but the minimum for most players is the Artist Name and Track Title. Once you have entered the data select “OK” to finish the export process.
Congratulations, you have now successfully created your first Podcast with clean audio. I hope this helps you continue to create professional sounding Podcasts for you and your ministries. Happy Podcasting and thank you for taking this tutorial!!!!